


2D Drawings
Rework
Knowledge Transfer
Manufacturing DX
October 26, 2026
What Is a Drawing Check? Purpose, Check Points, Process and How to Standardize It
 Updated on 2026/10/26
Index
A drawing check (kenzu) is the task of confirming that the drawings and models a designer has produced are free of errors before they go to manufacturing. It is routine in most design departments, yet what to check and how far is often left to the checker’s experience.
This leads to familiar problems: findings change depending on who checks, the load concentrates on senior engineers, and drawings that passed the check still come back from downstream processes.
This article sets out the purpose of drawing checks and two ideas behind them: the product check and the drawing check. It then ranks the drawing check needs WOGO has heard from design departments at manufacturers by check point, and explains how to run drawing checks and how to standardize them so they do not depend on individuals.
Key points
- A drawing check is a review task that keeps design errors from flowing into manufacturing and procurement. It combines the designer’s self-check with a check by someone else
- There are two kinds: the product check, which looks at whether the design itself is right, and the drawing check, which looks at whether the drawing is drawn correctly
- Today, both are usually checked together at the drawing release stage, once the 2D drawings exist. The product check prevents more rework when it is done while the design is still in 3D CAD
- In WOGO’s own research, the most frequent need is assembly interference and assembly problems, followed by past failures and compliance with in-house standards, machining limits, and missing dimensions and drawing instruction errors
- To keep drawing checks from depending on individuals, write down the check points, align the criteria and feed findings back into the rules. Items that can be judged from geometry and numbers can be automated
What is a drawing check?
A drawing check is the task of reviewing the 3D CAD models and 2D drawings a designer has produced, before they go to manufacturing and procurement, and finding and fixing errors, omissions and rule violations. A drawing is the instruction that everyone downstream uses: machining, assembly, inspection and procurement. If errors flow through, they come back as rework: parts that cannot be made, parts that do not fit, questions from suppliers, or parts that have to be made again. The drawing check is the gate that stops this before release.
A drawing check usually combines a self-check by the designer with a check by someone else, such as a supervisor or senior designer. Some companies split it into first and second checks followed by approval, and change the check points at each stage.
A design review (DR), in which several departments discuss the direction of the design itself, differs from a drawing check in both the question it asks and its timing. The differences are covered in Design Review (DR) vs Drawing Check.
The purpose of a drawing check
A drawing check has three main purposes.
- Keep errors from reaching downstream processes: find missing dimensions and wrong instructions before release, and prevent questions and remakes in manufacturing and procurement
- Confirm that the design can be made and assembled: find shapes that cannot be machined, interference between parts, and places where a tool cannot reach during assembly before anything is made
- Assure quality: keep a record that someone other than the designer has checked it. Quality management audits may require a check by someone other than the designer
Drawing checks split into a product check and a drawing check
What people call a drawing check actually covers two different things. WOGO thinks of them separately as the product check and the drawing check.
| Aspect | Product check | Drawing check |
|---|---|---|
| Question | Can this design be made and assembled, and will it work? | Does this drawing communicate correctly, without errors? |
| Main check points | Machining limits, interference between parts, ease of assembly, validity of strength and material | Missing dimensions and tolerances, drafting rules, title block and notes, 3D/2D consistency |
| What is checked | 3D CAD models (parts and assemblies) | 2D drawings, bill of materials |
| Ideal timing | While designing in 3D CAD | Before releasing the 2D drawings |
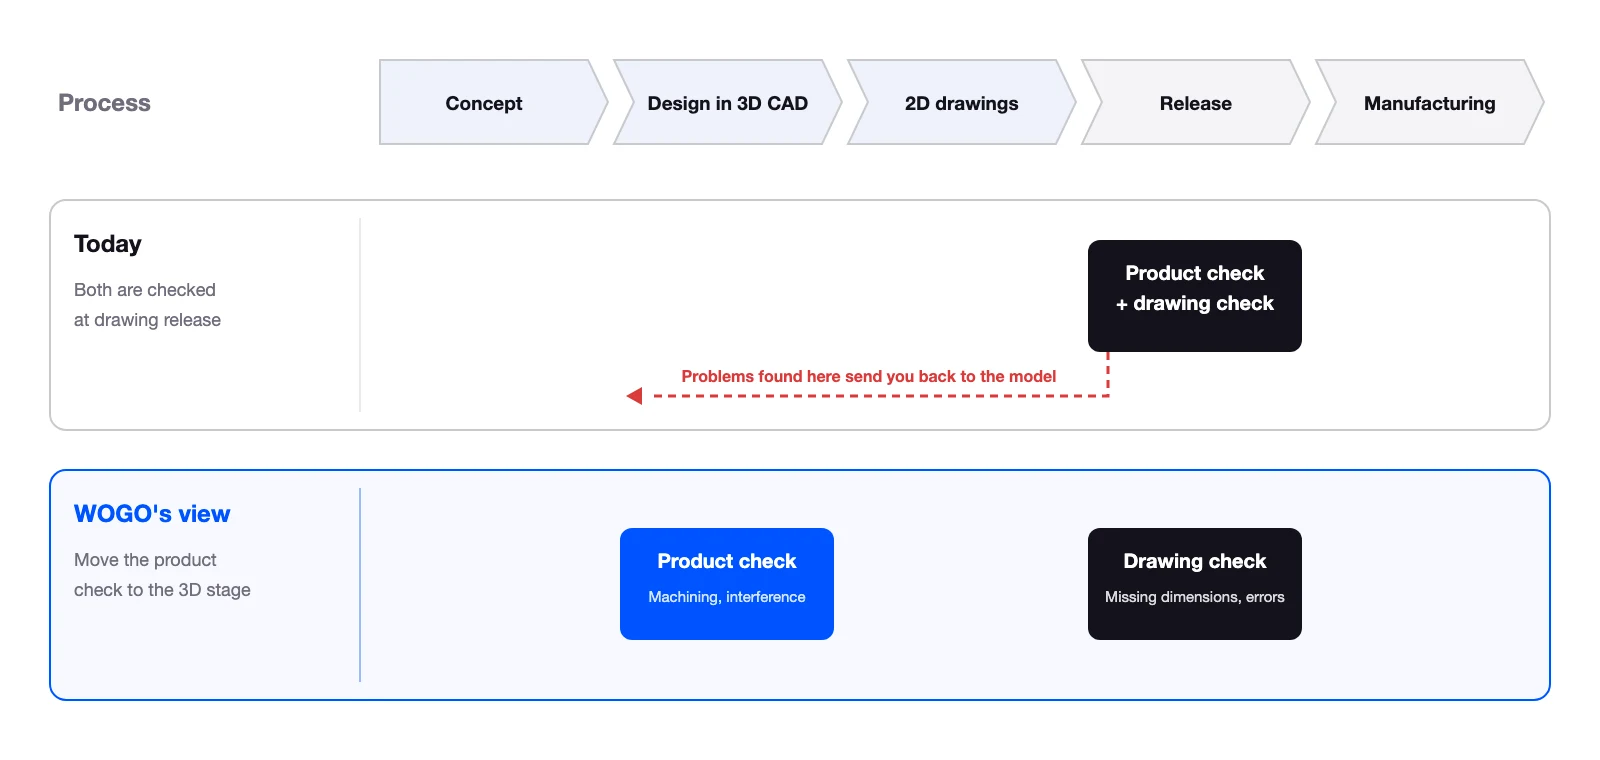
Today, everything is usually checked once the 2D drawings exist
At most workplaces today, drawing checks happen at the release stage, once the 2D drawings are finished. The checker goes through the drawings one sheet at a time, checking drawing check items such as missing dimensions and wrong symbols, and product check items such as whether the part can be machined and whether anything interferes, at the same time.
This approach has weaknesses. If it turns out at release that a shape cannot be machined or a part cannot be assembled, the work has to be redone from the model to the drawings. We also hear that because 2D drawings are checked one sheet at a time, relationships between parts, such as tolerance stack-up and interference once assembled, are hard to confirm.
The product check prevents more rework at the 3D CAD stage
WOGO believes the product check should be done while the design is still in 3D CAD. Machining limits and interference can be judged from the shape of the 3D model, so they can be checked before any drawing is made. If a problem is found during design, only the model needs fixing and nothing has to be redrawn.
Separating the product check from the drawing check lets the check before release focus on whether the drawing communicates correctly. Simply having the two concepts is the first step toward spreading the load of drawing checks.
Check points ranked by demand
We classified the drawing check problems and requests we have heard in sales meetings and regular meetings with design departments at manufacturers by check point, and ranked them by how many companies raised each one (WOGO’s own research). Ranks 2 to 4, and ranks 5 to 7, are each close.
| Rank | Check point | What is checked | Type |
|---|---|---|---|
| 1 | Assembly interference and assembly problems | Interference between parts, whether parts fit in assembly order, whether tools and hands can reach | Product check |
| 2 | Past failures and compliance with in-house standards | Whether shapes or configurations that caused problems before are repeated, whether in-house design standards are met | Product check |
| 3 | Machining limits | Distance from holes to bends and edges, tool reach, wall thickness, draft and other process constraints | Product check |
| 4 | Missing dimensions and drawing instruction errors | Missing or duplicated dimensions, wrong line types, symbols and notes, gaps in the title block | Drawing check |
| 5 | Material, surface treatment and welding instructions | Choice of material, treatments such as plating and painting, appropriate welding instructions | Product check and drawing check |
| 6 | Function, strength and maintainability | Whether required functions are met, rigidity and strength, ease of maintenance | Product check |
| 7 | Tolerances and fits | Missing tolerance callouts, choice of fits, tolerance stack-up | Product check and drawing check |
| 8 | Consistency between the 3D model, 2D drawing and bill of materials | Whether dimensions in the model and drawing, and part numbers and quantities in the bill of materials, agree | Drawing check |
The top three are all product check points that can be judged from 3D geometry. Concerns gather less around how drawings are written than around whether parts can be made, whether they fit together, and whether past failures are being repeated.
No. 1: Assembly interference and assembly problems
The most frequent need was interference between parts and designs that cannot be assembled. Each part is fine on its own, but parts interfere once assembled, or a tool or hand cannot reach when following the assembly order. Some say this happens more in designs by younger engineers, while on equipment with many parts even senior engineers miss details. Many workplaces end up checking by eye, because the CAD interference check also picks up purchased-part models and produces large numbers of false positives. The check points are summarized in Assembly Design Checklist.
No. 2: Past failures and compliance with in-house standards
This is about whether past failures are being repeated and whether in-house design standards are met. We often hear that failure reports and standards documents exist but are not linked to design information, so checkers rely on memory to match them. Standards documents also mix items that can be judged numerically with items judged by experience, which is another reason drawing checks come to depend on individuals.
No. 3: Machining limits
These are shapes that cannot be made, or are hard to make, with a given process, such as a hole too close to a bend line or a groove deeper than a tool can reach. Many say they used to ask a senior colleague, or that they rely on the checker’s experience. Typical items for each process are explained in the Sheet Metal Design Checklist, Machining Design Checklist and Resin Part Design Checklist.
No. 4: Missing dimensions and drawing instruction errors
This is the typical drawing check point. We hear comments such as “with experience you learn the machining rules, but even senior engineers miss dimensions” and “even after the check, missing dimensions turn up on parts with many holes.” We also hear that much of the checking time goes to pointing out notation errors, such as wrong line types or overlapping leader lines. The items to check are set out in 2D Drawing Check List.
No. 5 and below: materials and treatments, function, tolerances, consistency
Below fifth place come material, surface treatment and welding instructions; function, strength and maintainability; tolerances and fits; and consistency between 3D, 2D and the bill of materials. Some of these, such as function and strength, depend heavily on the checker’s experience and each product’s circumstances. Some say “the essence of a drawing check is proposing a better process or lower cost,” which suggests that once the items that rules can judge are reduced, what remains is the drawing check that people should do.
How a drawing check is done
A typical drawing check proceeds as follows.
- Self-check: the designer checks against a checklist and fixes obvious omissions first
- Request: in addition to the 2D drawings, the designer gathers the materials the checker needs to judge, such as the 3D CAD model and bill of materials, and requests a check
- Check: the checker reviews each check point and writes findings on the drawing or a findings sheet
- Correction and recheck: the designer makes corrections and the checker confirms the findings are resolved
- Approval and release: the approver signs off and the drawings go to manufacturing and procurement
- Recording findings: findings are recorded and used to revise checklists and design rules
When splitting the check into first and second stages, deciding the role of each stage, for example the drawing check in the first stage and the product check and functional aspects in the second, reduces overlap.
Why drawing checks come to depend on individuals
Dependence on individuals is one of the most common problems we hear about. There are three main reasons.
- The check points live in the checker’s head: even with a checklist, some items are words only, with vague criteria. In the end, the checker’s experience decides
- Checkers have other work and limited time: team leaders check drawings alongside their own design work, so they catch only obvious problems and cannot see every detail
- Findings do not feed back into the next design: findings are stored in files but never revisited, so the same mistakes are repeated
How to standardize drawing checks so they do not depend on individuals
Write down the check points, including the criteria
Start by turning the check points into a checklist. Writing not only the item names but also the criteria, such as how many millimeters is acceptable or what state counts as a fail, along with illustrated examples, reduces differences between checkers. A list of generic items is too obvious to be effective, so it is important to include failures that actually happened at your company and your customers’ drawing rules.
Put the self-check first and let checkers focus on items that need judgment
Make it a rule that items the designer can check, such as missing dimensions, are done before the drawing goes for checking. Checkers can then spend their time on items that need experience, such as function, assembly and cost. Letting younger engineers fix problems on their own first also helps with training.
Move the product check to the 3D CAD stage
Items that can be judged from the 3D model, such as machining limits and interference, are checked during design rather than just before release. The check before release can then focus on the drawing check, which reduces both the checking load and rework.
Automate items that can be judged from geometry and numbers
Items that can be judged from geometry and numbers, such as missing dimensions, machining limits and interference between parts, are areas where automated checking by software works well. Separating what the machine reliably checks from what people check closely frees senior engineers’ time for drawing checks that need judgment. Automating drawing checks is covered in detail in What Is AI Drawing Inspection?. WOGO is also working on automated design verification, which automatically detects machinability problems and design rule violations from 3D CAD data.
Frequently asked questions about drawing checks
Who does the drawing check?
Typically, after the designer’s self-check, a supervisor or senior designer checks the drawing. Some companies have dedicated checkers, or have production engineering or procurement staff check from a machinability perspective. From a quality assurance standpoint, a check by someone other than the designer is considered important.
What is the difference between a drawing check and a design verification check (shosa)?
Both are tasks that review deliverables. In mechanical design in manufacturing, reviewing drawings and models is usually called a drawing check (kenzu). In civil engineering and construction, a review of design deliverables by another engineer is often called shosa, so the difference is mainly which industry uses the term.
If we design in 3D CAD, do we still need to check 2D drawings?
Yes. At many workplaces, instructions to manufacturing and procurement are still given on 2D drawings. What the drawing communicates, such as dimensions, tolerances, notes and the title block, needs a drawing check. On the other hand, checking product check items such as machining limits and interference at the 3D CAD stage makes the check before release lighter.
How should we build a drawing checklist?
We recommend starting from generic items and adding failures and reasons for rejected drawings from your own company’s past. Writing the criteria and an illustrated example for each item, and deciding whether it belongs to the product check or the drawing check, makes the list easier to use. For check points by process, see the sheet metal, machining, resin and assembly checklists.
Where should we start to make drawing checks more efficient?
Start by classifying recent rejections and findings by check point. Just separating the frequent check points into those that can move to a self-check or automated check and those that need the checker’s judgment shows where to act.
Summary
A drawing check is the gate that keeps design errors from flowing into manufacturing and procurement. It covers the product check, which looks at whether the design itself can be made, assembled and will work, and the drawing check, which looks at whether the drawing communicates correctly. Today both are often checked together at release, but moving the product check to the 3D CAD stage prevents more rework.
In WOGO’s own research, the most frequent need was assembly interference and assembly problems, followed by past failures and compliance with in-house standards, machining limits, and missing dimensions and drawing instruction errors. Most of the top items are product check points that can be judged from 3D geometry and tend to rely on the checker’s experience.
The shortest path to keeping drawing checks from depending on individuals is to write down the check points and criteria, separate the roles of the self-check and the drawing check, and feed findings back into the rules. Automate the items that can be judged from geometry and numbers, and spend people’s time on the drawing checks that need judgment.
If you would like to discuss how to run or standardize drawing checks, or how to automate them, you are welcome to contact us.
This article was written by WOGO Inc., a University of Tokyo-originated startup developing systems for design verification, automated drawing inspection and design/drafting automation in manufacturing using 3D, CAD and AI technologies.